Docker is an essential tool for modern software development, enabling consistency, scalability, and isolation for your applications. Learning to use Docker is a valuable time investment, especially for backend developers.
Being comfortable with it has many benefits like:
In this post, we will go over how to use Docker CLI to run Docker containers, how you can use docker-compose.yml to start many containers with a single command, and how you can dockerize your application (the focus will be on web applications and examples will use NestJS framework).
There will be plenty of examples and hands-on code-along exercises. We will also go over some tips when debugging containers.
Before we start, you need to have Docker installed. Here you can find instructions on how to do that for different platforms.
Popular technologies already have docker images created that you can use out-of-the-box. These images can be found on various public image registries (like DockerHub or ghcr.io). For example, to run Redis container we can use command (flags will be explained later):
docker run -d --name my_redis redis
To see running docker containers run:
docker ps

CONTAINER ID   IMAGE     COMMAND                  CREATED         STATUS        PORTS      NAMES
efa20e111f71   redis     "docker-entrypoint.s..."   2 seconds ago   Up 1 second   6379/tcp   my_redis
In this example we are using redis image because we don’t care about Redis version and we don’t care about base operating system used in the image. We can see all available tags on Dockerhub page for Redis Docker image. There are different versions (8, 7, 6 etc.) and also base images such as alpine and bookworm.
In short, alpine images (based on Alpine Linux) are very lightweight and recommended, they don’t include many utilities which are not needed for running our services. This is great for performance and security, but can sometimes be annoying when debugging containers because they don’t have many useful tools (e.g. curl).
We will discuss base images more when we get to building our own docker images.
We can stop container with any of the following commands (by name or by container ID):
docker stop my_redis
docker stop efa2 # no need to type entire ID, only first couple of characters that are unique among currently running containers
This stops the container, but doesn’t remove it. You can start the stopped container with the following command (or you can use ID like with stop command):
docker start my_redis
You can see all stopped containers with this command:
docker ps -a
To remove stopped container (or you can use ID):
docker rm my_redis
Difference between just stopping the container and removing it is that containers save state when stopping/starting, but removing container will remove its state as well. We will soon see how we can persist state even when containers are removed.
Before we show an example with multiple Docker containers and connecting them together, let’s talk about networks in Docker. Networks can be created with different drivers (using --driver flag when using docker network create command).
There are many drivers but for now we will go over bridge and host:
bridge driver is default and it offers isolation between containers, this is preferred in almost all cases. We can map container ports to different ports on the host and we can choose not to expose ports to the host. Container will access its own ports when using localhost, but we can use special DNS name host.docker.internal to access host machine (this needs an additional flag for docker run command to work on Linux --add-host=host.docker.internal:host-gateway).host driver lets containers share host’s network - containers can communicate with each other using localhost but since they are not isolated there can be port clashes. Ports don’t need to be mapped to the host, they will automatically have all their ports exposed on the host. Containers also have access to any other ports of apps running on the host machine. On Linux, the “'host” is the physical machine, but on Windows/macOS, host networking works differently due to Docker Desktop’s virtualized environment, where the 'host' is actually a Linux VM. There can only be one network with host driver and it should be created by default with name simply being host (you can check this by using docker network ls).Let’s see how we can start new Redis instance together with Redis Insight container to see Redis data in our web browser. We will also show how different bridge and host networks work on this example by starting 2 Redis Insight containers in different networks.
NOTE: If you are on macOS or Windows host, you might need to enable host networking first if you want to follow along. Go to Docker Desktop -> Settings -> Resources -> Network and check “Enable host networking” and restart Docker Desktop (you can disable it after this tutorial again). This will simulate how host networking works in Linux.
docker network create my_network
docker run -d --network my_network -p 5555:6379 --name my_redis redis
docker run -d --network my_network -p 5541:5540 --name redisinsight_bridge redis/redisinsight
docker run --rm --network host redis/redisinsight
Flags that we used:
-d, --detach - starts container and runs it in the background (without it, we would see container logs and couldn’t issue any other shell command, pressing CTRL+C would stop the container).--rm - automatically remove container when container stops, this is useful when running some utilities like pgAdmin or Redis Insight.--name - assigns name to the started container. It is useful when managing this container with commands like stop, restart, rm etc. If name is not given, a random name will be generated.-p - maps port from container to host. Syntax is host_port:container_port. This lets us connect to container from our host machine using localhost and port.--network - connects container to a network (we have created network for this tutorial in the first command above).
We are going to connect to Redis from both Redis Insight instances, but first is an image to visualize our setup right now.
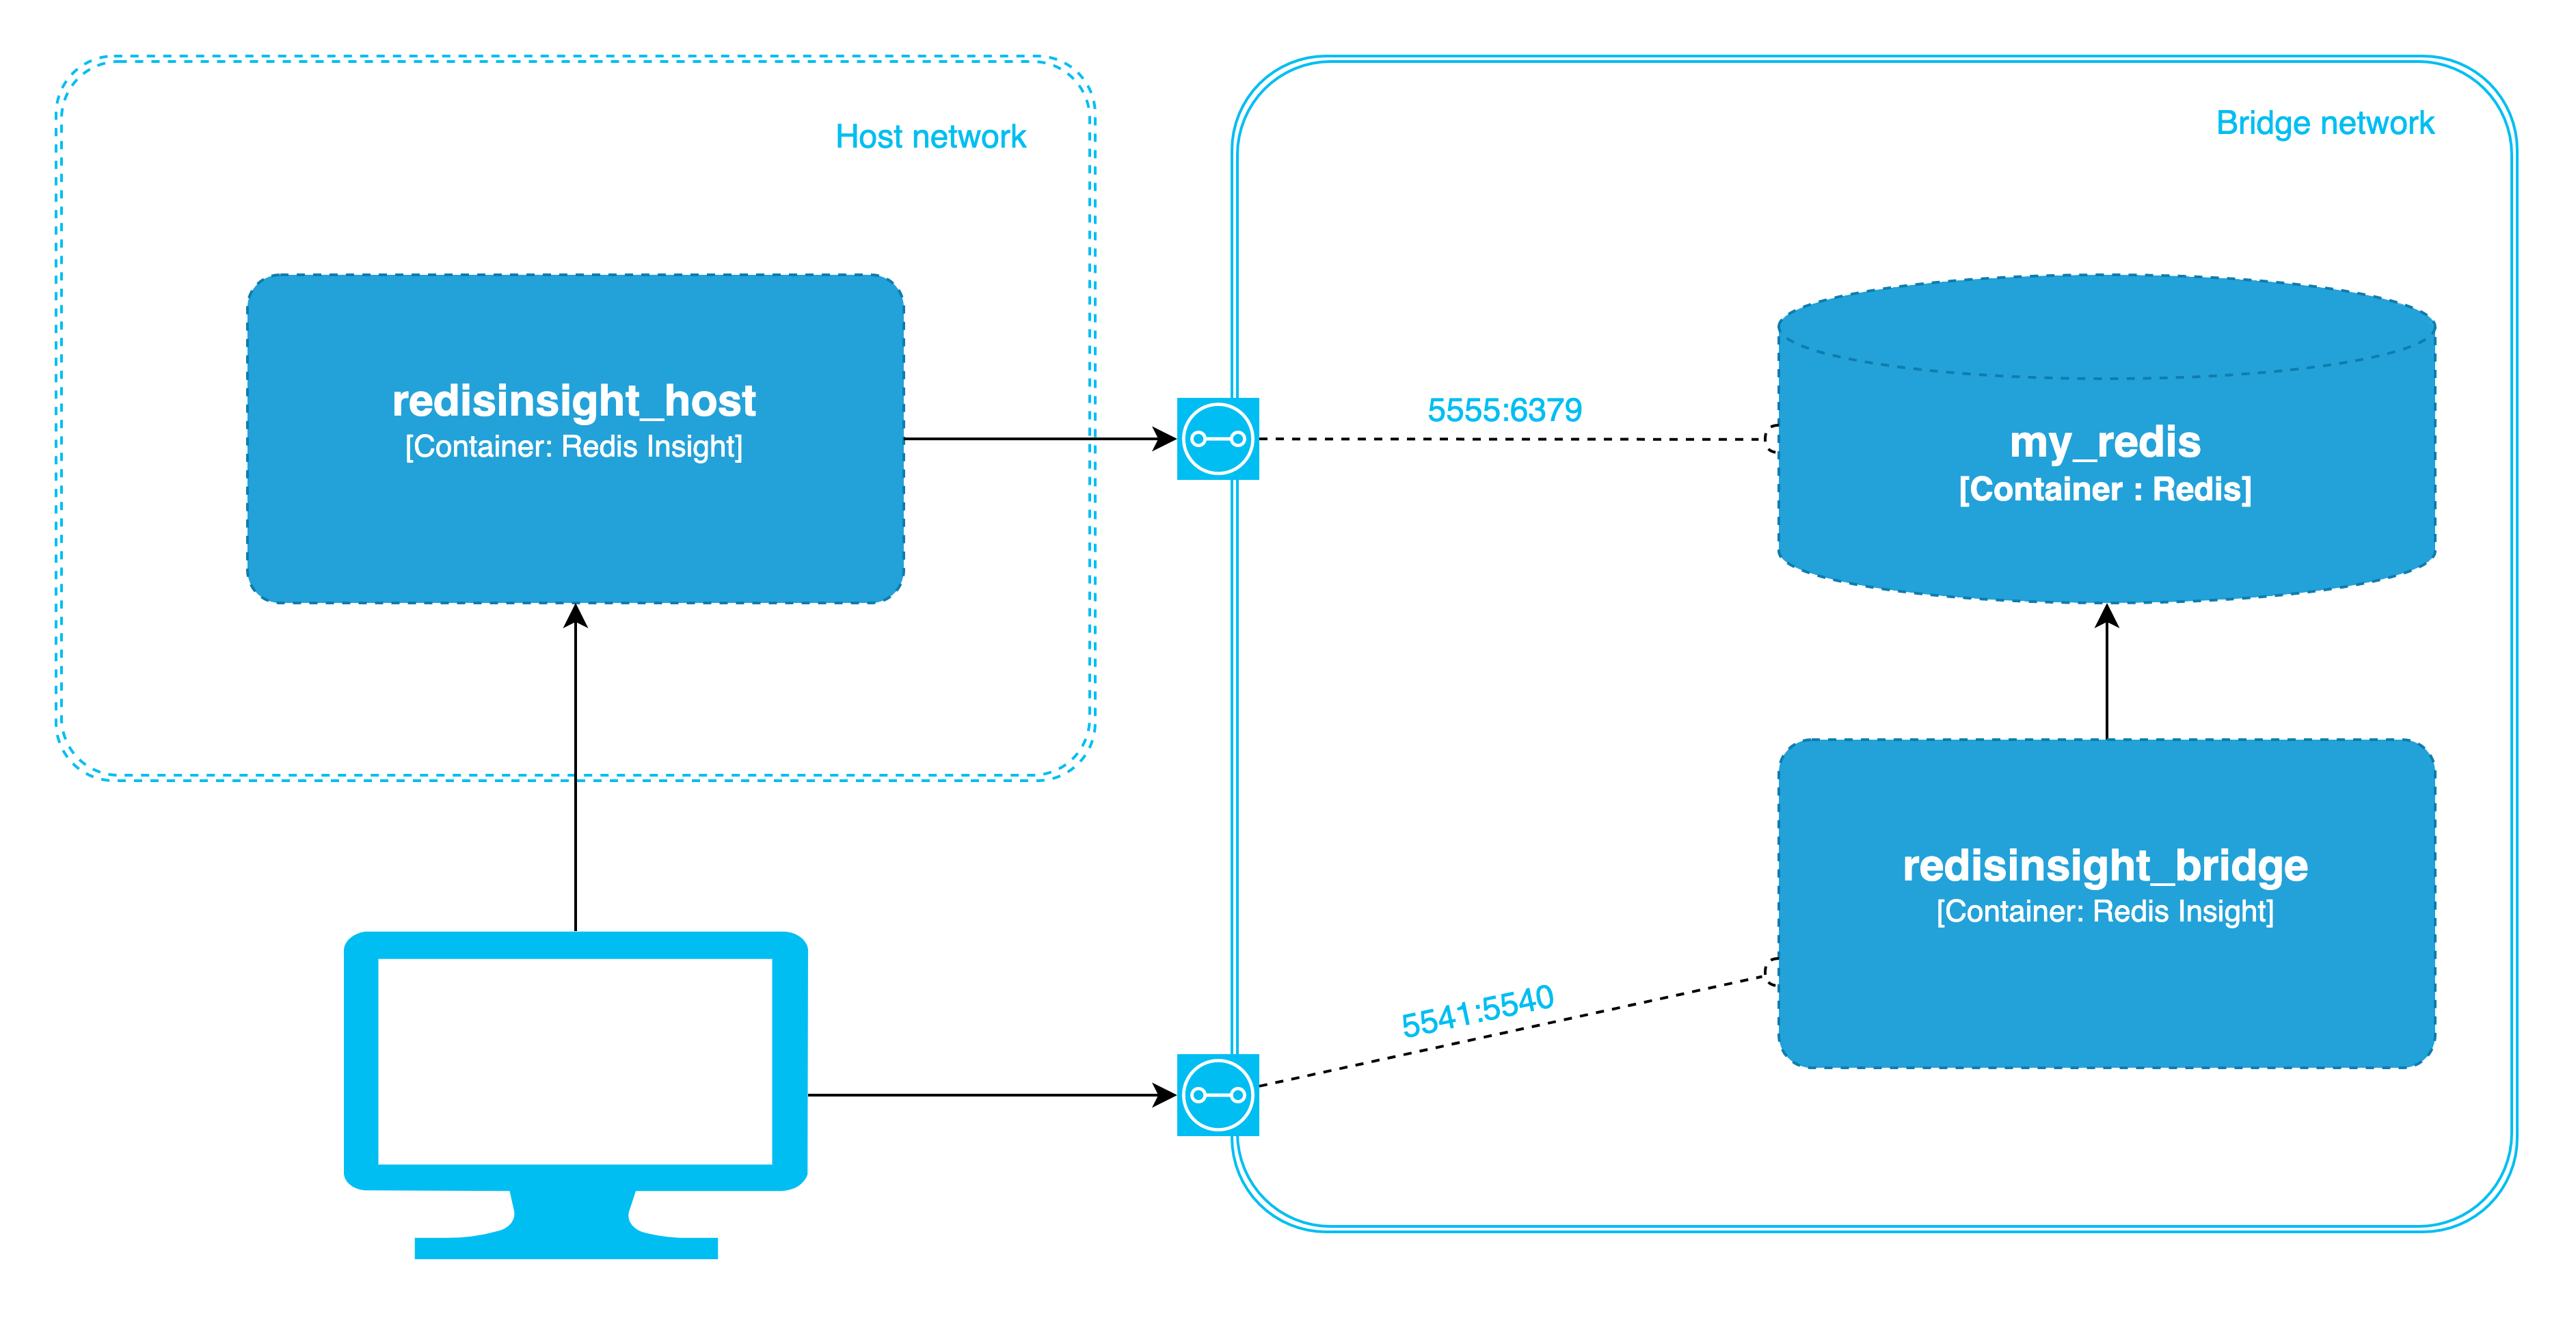
Now we can go to web browser URL http://localhost:5541. This is Redis Insight in bridge network, it maps its container port 5540 to host port 5541.
Connect to Redis using these steps:
redis://default@my_redis:6379To connect to Redis Insight in host network go to http://localhost:5540 and follow the same steps above.
It will fail, because now we have to use Connection URL redis://default@localhost:5555 - hostname is localhost and port is the host mapped port which is 5555. We can stop Redis Insight in the host network now by pressing CTRL+C (thanks to --rm flag, the container will be removed as well).
The next thing to experiment with are volumes for persisting data.
Go to http://localhost:5541 and let’s add sample data to Redis:
This will create some job queues, leaderboards and session keys that we can browse.
If we stop and remove Redis container, then start it again:
docker stop my_redis
docker rm my_redis
docker run -d --network my_network --name my_redis redis
Now in Redis Insight we can see that sample data is not present. Usually when running these stateful workloads (like databases), we want our data to persist even when containers get removed. To do that, first we need to check Redis docker image documentation to see where inside the container is application data located which says that data path is just simply /data.
Next step is to run docker container with volume mounted to that path. To do that run:
docker stop my_redis
docker rm my_redis
docker run -d --network my_network --volume my_redis_data:/data --name my_redis redis
This will create my_redis_data named volume (which can be listed with docker volume ls command) and map it onto /data directory inside the container. This volume survives container removal and as long as we start Docker container with same volume, the data should be persisted. We can test this by adding sample data again, then removing my_redis container and then running it again and checking data inside Redis again.
There are two ways of storing data in the container:
docker volume <command>)
Our docker commands are getting pretty long and cumbersome to use at this point. And we are only running 2-3 containers, imagine if we had to start more containers. To simplify starting many containers we can define our services in docker-compose.yml and use Docker Compose CLI. This is the preferred way of starting containers in our local development setup. Before we jump into Docker Compose, let’s delete everything that we have created so far:
docker stop my_redis
docker rm my_redis
docker stop redisinsight_bridge
docker rm redisinsight_bridge
docker network rm my_network
docker volume rm my_redis_data
There are still some leftovers like docker image that takes up space on our device which can be removed with docker image rm <image_name>. Or later when we notice that we are running out of space on our host machine, we can run something like docker system prune --all which removes all unused images, containers and networks (and optionally we can add --volumes flag as well to remove currently unused volumes as well).
To start containers from our previous example, docker-compose.yml would look like this:
services:
  my_redis:
    image: redis
    volumes:
      - my_redis_data:/data
  redisinsight:
    image: redis/redisinsight
    ports:
      - 5540:5540
volumes:
  my_redis_data:
As you could predict, this file uses YAML syntax. You can find quick YAML tutorials online (like here or here), but for now all you need to know is this:
key: value (e.g. image: redis in the example above) my_redis and redisinsight which have dictionaries as their values)- (hyphens, like in volumes and ports) or with square brackets (like in command: [‘start-dev’] that we will see in the next compose file) services.my_redis.volumes to not use shorthand version which would be written like this (in this example there is one list item which is a dictionary with type, source and target fields):volumes:
- type: volume
source: my_redis_data
target: /data
One thing to note regarding volumes in docker-compose.yml is that by default they will be prefixed with <folder_name>_ (so in the output of docker volume ls the above example would be something like myapp_my_redis_data (if folder where project is located is myapp) instead of just my_redis_data.
This can be changed using COMPOSE_PROJECT_NAME environment variable in .env file in the same folder or by using -p flag to docker compose commands. Same prefixing logic applies to networks defined in compose file, unless they are created externally (they have external: true option and should be created beforehand using docker network create command). And it also applies to services and images (created with build block).
There are basic Docker Compose CLI commands:
docker compose up # starts container, -d flag can be used to start containers in the background

docker compose ls # show running containers is

docker compose logs # show logs, we can pass -t flag to tail logs, CTRL+C to stop tailing

docker compose stop # stop containers

docker compose down # remove containers, -v flag can be used to also delete volumes
up, logs and stop can also have name of services that we want to start/log/stop:
docker compose up -d my_redis
if docker-compose.yml is named differently or there are multiple files that we want to start, we can use -f flag for each file:
docker compose -f <file1> -f <file2> up
Let’s stop and remove these containers (with down command) and then edit docker-compose.yml to create a more real-life setup, so we can learn more about the structure of this file.
services:
  my_postgres:
    image: postgres:16.4-alpine
    restart: always
    ports:
      - 5432:5432
    environment:
      - POSTGRES_USER=${DB_USER}
      - POSTGRES_PASSWORD=${DB_PASSWORD}
    volumes:
      - postgres_data:/var/lib/postgresql/data
      - ./volumes/infra/postgres:/docker-entrypoint-initdb.d:ro
   healthcheck:
      test: ["CMD-SHELL", "pg_isready -U postgres"]
      interval: 10s
      timeout: 5s
      retries: 5

  my_keycloak:
    image: quay.io/keycloak/keycloak:26.0.2
    restart: always
    ports:
      - 8080:8080
    command: ['start-dev']
    environment:
      KC_DB: postgres
      KC_DB_SCHEMA: keycloak
      KC_DB_URL: jdbc:postgresql://my_postgres:5432/postgres
      KC_DB_USERNAME: ${DB_USER}
      KC_DB_PASSWORD: ${DB_PASSWORD}
      KC_HOSTNAME: ${KC_HOSTNAME}
      KC_HOSTNAME_PORT: 8080
      KC_BOOTSTRAP_ADMIN_USERNAME: keycloak
      KC_BOOTSTRAP_ADMIN_PASSWORD: keycloak
    depends_on:
      my_postgres
        condition: service_healthy

volumes:
  postgres_data:

networks:
  default:
    name: my_network
    driver: bridge
    external: true
And .env file that looks like this:
DB_USER=postgres
DB_PASSWORD=posgres
In this example we have Postgres and Keycloak services. On top level, we have these blocks.
networks - defines default network that services defined in this file use. If this block is omitted then default network will be created with name <folder_name>_default in bridge mode.volumes - defines one named volume postgres_data that persists dataservices - defines two services my_postgres and my_keycloak
my_postgres restart - sets restart policy in case of crash, Docker daemon restart or system reboot. Available values are: no - default, container is not restarted in any situationon-failure - restarts only if exit code is non-zero. Optionally can set max number of retries (on-failure:5 would be max of 5 retries)unless-stopped - if manually stopped, container will stay stopped. After Docker daemon restart or system reboot, the container will remain stopped if it was manually stopped.always - container will always restart unless manually stopped. In case of manual stop, container will stay stopped until Docker daemon restart or system reboot when it will start again..env file (${ENV_FILE_VARIABLE} syntax) in the same folder. We can see which environment variables we need to set on the container by checking postgres Docker image docs.volumes block and one folder that is mounted from host machine. /var/lib/postgresql/data and /docker-entrypoint-initdb.d folders inside postgres docker are specific to postgres docker image and their purpose is explained in docs - former is for persisting data and the latter is for startup scripts (only executed on first container start, when data folder is empty). Scripts can be .sql or .sh and are executed in alphanumerical order, so it is a good idea to name them with numerical prefix, e.g. 000_create_schemas.sql.my_keycloak has couple of additional options command - depending on how docker image is created, this can either completely override command that starts container or it can provide additional arguments that are passed to the entrypoint executable (defined with entrypoint in docker-compose.yml or with ENTRYPOINT in Dockerfile during image creation. If we run docker image inspect quay.io/keycloak/keycloak:26.0.2 we can see that entrypoint is kc.sh script, so in this case we are passing start-dev as argument to this script to start Keycloak in development mode. entrypoint and command can either be an arrays like in example (also known as “exec form”), or a string (“shell form”). Exec form is preferred due to better signal handling, but sometimes we might need to use shell form (e.g. shell variable expansion).my_postgres service, we can see in KC_DB_URL environment variable that we use my_postgres as hostname which works because of default bridge network.depends_on - this means that if we want to start only my_keycloak service by running docker compose up my_keycloak it will make sure that dependent service is started first and because of services.my_postgres.healthcheck block and services.my_keycloak.depends_on.my_postgres.condition it will wait for postgres to be ready to accept connections. Without this configuration, it would only wait for postgres container to start. This can cause service to crash if dependent service is not truly ready. To avoid this we have added healthcheck block which uses pg_isready utility.image: keycloak/keycloak which would try to find image keycloak/keycloak on dockerhub)If we had a web application that needs to connect to these two services, we can either start it on host machine (e.g. yarn start for NestJS application) and use localhost:5432 and localhost:8080 for connecting to postgres and keycloak respectively (thanks to mapped ports).
Another option is to dockerize our application and then add it to this docker-compose.yml so everything can be started with one command. In that case we will have to connect to services using their container names - database by using my_postgres hostname and Keycloak using my_keycloak. We will discuss dockerization of our apps later.
That would be a simple docker-compose.yml that you might see on a smaller project, but for a more complicated setup you can check this github repository. In this example there are 3 compose files:
docker-compose.infra.yml - contains infrastructural services:docker-compose.tools.yml - contains some tools that we might find useful for debugging or exploring data. It has Redis Insight for connecting to Redis and pgadmin4 for connecting to Postgres. These are started only when needed.docker-compose.yml - contains our apps and their Dapr sidecars
Infra compose file is pretty long, but there isn’t anything new in here, all of these docker containers are configured based on their documentation:
./volumes/infra/<service> folder with its configuration files
One interesting thing is that Traefik service mounts Docker socket from host machine, this gives container access to host’s Docker daemon. Basically, it can run docker CLI commands (like docker ps and docker inspect <container>). In case of Traefik it continuously monitors running containers and checks their labels. You can see these labels in docker-compose.yml file where our apps are defined.
We can start/stop these infra services by running:
docker compose -f docker-compose.infra.yml up -d
docker compose -f docker-compose.infra.yml down
In docker-compose.yml, we can see couple of new things that we haven’t seen in previous compose files:
x-logging - this is docker compose extension which lets us define reusable blocks that can be referenced in other places (using *default-logging). Since all of these services use same configuration for logging, we can define it in one place instead of repeating ourselves.network_mode: service.<service_name> - Dapr sidecars have this field which means that they share network stack with a given service. One effect of this is that they can communicate with that service (and vice-versa) using localhost.labels - we can put anything here, but some services (like Traefik) give meaning to certain labels. Traefik, for example, lets us configure how it will handle traffic to certain services using labels that start with traefikbuild - when defining our own apps in compose file, we use this block to configure how docker image will be built (instead of image block that tells which image to use)develop.watch - this is a “newer” feature of compose file. It defines which files are watched for changes if containers are started with docker compose watch command. When files change we can define what happens with the container: rebuild - rebuilds imagerestart - restarts imagesync - syncs files from host to containersync+restart - syncs files then restarts the containersync+exec - syncs file then runs a commandWe can see that in the linked github repo, there is a monorepo with apps/order-svc and apps/inventory-svc subfolders with NestJS apps. These apps have multistage Dockerfile (we will explain this in the next post) and build blocks use installer step which has all dev dependencies (like Typescript) that we don’t want in our production container, but we want during development in order to have hot reload and other nice to have features.
The next two small chapters are NestJS specific, but they can help us learn a couple of things about Docker.
NestJS has hot reload feature when application is started with yarn start:dev command. When files are changed, the application will immediately reflect any changes. In order to have hot reload of NestJS apps running inside Docker, the entire source code is mounted into the container, but anonymous volume is mounted over node_modules. Anonymous volumes only have path to directory inside the container, without it being preceded with bind mount on the host or named volume:
- /path/inside/container
instead of
- named_volume:/path/inside/container
This is needed because binaries in node_modules need to be built for specific OS (we can’t build them on our host machine and mount them inside container, they need to be built for specific OS that container is running). This way node_modules that are built during docker image creation are the ones that are inside the container when it starts. All other source files are mounted from our host machine so nest can monitor their changes and hot reload when needed.
One caveat of this is that when we add/remove/update dependencies in our package.json files, we will need to rebuild the image and restart the container. We should also use docker compose up -V flag to create fresh anonymous volumes. Not using -V flag would cause node_modules to persist between Docker builds which would cause some very weird issues because node_modules directory would be one that was created on the initial Docker build and not the new one with updated dependencies.
In this example, if we start containers using docker compose watch, it will automatically rebuild image when package.json and schema.prisma files are changed thanks to develop.watch block in the compose file. We could rewrite entire hot reloading logic with develop.watch (instead of mounting local source files using bind mount, we could add them to watch with sync action and ignored node_modules) but in this post we want to show both approaches.
Another thing that we can configure additionally for development purposes is debugging. Sometimes we want to set breakpoints in our NestJS application to slowly go through code and check our application state during execution. In NestJS, this is achieved by starting app using start:debug script which by default looks like this nest start --debug --watch, however if process is running inside Docker, we need to add additional flags to this command nest start --debug=0.0.0.0 --watch to bind debug port to all network interfaces (Node.js debugger by default binds only to 127.0.0.1), then we can change command of service to use start:debug (instead of start:dev) and we also need to expose port 9229 by adding it to ports array. After that we need to setup our IDE for remote debugging. This depends on which IDE we are using but will require following information:
Before we explain how you can dockerize your application, first we need to explain how Dockerfile works. Here is an example of a simple Dockerfile for building docker image for NestJS application (based on NestJS documentation):
FROM node:20
WORKDIR /usr/src/app
COPY package*.json ./
RUN npm install
COPY . .
RUN npm run build
EXPOSE 3000
ARG NODE_ENV=development
ENV NODE_ENV=$NODE_ENV
CMD ["node", "dist/main"]
There are couple of instructions that are used:
FROM - this is the base image to be usedWORKDIR - sets working directoryARG - specifies docker build argument that can be passed using --build-arg flagENV - sets environment variable (in this case it is assigned to build argument called BUILD_ENV)COPY - copies files from host to container. Files that are copied from host need to be in the build context which is passed as one of the arguments to docker build command. This command is used twice in this Dockerfile: package.json and package-lock.json (if we were using yarn, we would copy yarn.lock instead)RUN - executes a command. It is also used twice: package.json and package-lock.jsonEXPOSE - documents which port application listens on. This is documentation only and does not publish this port.CMD - default command (which can be overridden when running the container)The reason for copying only necessary two files first is because each instruction creates a Docker image layer which is cached, so if we didn’t change instructions (and in case of COPY if we didn’t change copied files) we can benefit from this caching mechanism which will speed up Docker image creation considerably.
In our case, we have package.json which is rarely changed (only when we add/remove dependencies) and we have other Typescript files with our typescript code which we change all the time. Because of the way we wrote our Dockerfile, when only Typescript files are changed, if we run Docker build it will have cached layers for first 4 statements (until COPY . .), so it won’t be pulling base image or installing dependencies unnecessarily. This will significantly speed up Docker builds in those cases. If we change package.json then it will have to copy new package.json and install dependencies, then it will copy source files and rebuild the application.
Docker layer caching works even between builds of different applications, so if we have microservices that all use same technology/framework (e.g. NestJS), it would be beneficial to use the same base image and to install dependencies in the same order. This can speed up Docker builds significantly across different applications. By default Docker layers are cached locally on the same machine, but in CI/CD pipeline builds can run on separate machines, so to speed up builds in that situation we can look into remote layer caching solutions.
Generalized approach for writing Dockerfile:
node dist/main.js for node).alpine or slim if possibleCOPY files that are needed for the next RUN command. Dockerfile which copies only required files into final image
Here is an example of multi-stage Dockerfile to build Docker image for NestJS application which uses PrismaORM:
FROM node:22-alpine AS base
RUN apk update && apk add openssl

FROM base AS builder
WORKDIR /usr/src/app
COPY --chown=node:node package.json ./
COPY --chown=node:node yarn.lock ./
COPY --chown=node:node prisma ./prisma
RUN yarn install --immutable --production
RUN npx prisma generate
RUN yarn build
USER node

FROM base AS production
ENV NODE_ENV=production
COPY --chown=node:node --from=builder /usr/src/app/node_modules ./node_modules
COPY --chown=node:node --from=builder /usr/src/app/dist ./dist
CMD [ "node", "--enable-source-maps", "dist/src/main.js" ]
In this example we have 3 stages:
base node:22-alpine image and installs openssl packagebuilder package.json, yarn.lock and ./prisma from host to working directory inside the containerproduction - this is final image builder step and sets default command to run the container.The final image only has 2 folders that are needed for production application. Typescript source files and other configuration files are not included in the final image. During Docker multi-stage build, intermediate images (for non-final stage) are discarded after the build completes, but their layers might remain in the Docker cache.
Once we have Dockerfile ready, we can run docker build command:
docker build -t my_app .
-t gives a human readable name to the built image. If we don’t use this flag, Docker assigns randomly generated image ID.Dockerfile needs to have exact name and to be located in the root of the context. If it is somewhere else or it is named differently then we can use -f flag to specify which file to use.--build-arg - sets build argument (ARG inside Dockerfile), we can have multiple of these flags (e..g docker build -t myapp --build-arg NODE_ENV=production --build-arg INSTALL_DEV=true .)--add-host - adds static hostname-to-IP mapping--network=host - this lets build container to use host’s network stack (works on Linux host, but your mileage may vary on Windows or macOS)--dns - overrides global Docker daemon DNS configuration for this build--target <stage_name> to build container but to prematurely end docker container creation at specific stage. This can also be useful for debugging.
Last thing we are going to show are some tips and tricks on how to debug running/crashing containers.
First thing we can look into are container logs using:
docker logs -f -t 10 <container_ID or name>
Flags used:
-f to follow logs, to stop press CTRL+C-t 10 - to display only last 10 logs (or any other number), if number is omitted all logs since container start are printed. When combined with -f flag it will display last N logs then continue waiting and showing new logs.We can find container ID by listing all running containers:
docker ps
Flag -a can be used to also show stopped containers (in case our container crashed).
When using Compose, we can also do it this way:
docker compose logs -f <service>
If the container has crashed then we need to dig deeper. First thing we can try is to restart the container and then to enter the container to see if all files are where they should be. We can use following commands to do that:
docker exec -it <containerID or name> sh
sh is the command that we are running (some images can have something nicer like bash, but sh should be present on most of the images, at least among the ones used in web development) and -it flag makes this an interactive session, so it won’t run the command and close.
If we are using Docker Compose we can run:
docker compose exec -it <service> sh
Sometimes, we can’t enter the container because it fails very fast during startup. In this scenario, the trick is to override default command to something that will hang the container indefinitely. We can use something like tail > dev/null for this purpose. Now when we start the container, our app won’t be started, but the container will remain running and we can enter it using previous Docker commands.
Once we are in the container, we can check if all files are where they are supposed to be. We can try starting our app ourselves from within the container and seeing what is failing. Once we fix the issue, we can update Dockerfile and try starting the container again (with default command).
In this tutorial, we’ve covered using the Docker and Docker Compose CLI. We have also covered writing Dockerfile and docker-compose.yml configurations, as well as debugging containers.
By understanding the basic commands and some advanced options, you now have a solid foundation to confidently work with Docker. As you continue to explore and experiment with Dockerfiles, containers, and Compose configurations, the more skilled and efficient you’ll become in building and optimizing your containerized workflows. Happy coding!
This post is written by our Tech Lead Vladimir Dabić.
Photo by Rinson Chory on Unsplash

